Arduino uno LED Chaser :
An LED chaser using all digital pins from 0 to 13 on an Arduino Uno, you'll need to adjust the code to include all these pins.
Note that using pins 0 and 1 for LEDs can interfere with serial communication, so be aware of potential issues when uploading code or using the Serial Monitor.
Components Needed:
- Arduino UNO
- 14 LEDs
- 14 Resistors (220 ohms)
- Breadboard
- Jumper Wires
- Power supply 12 v
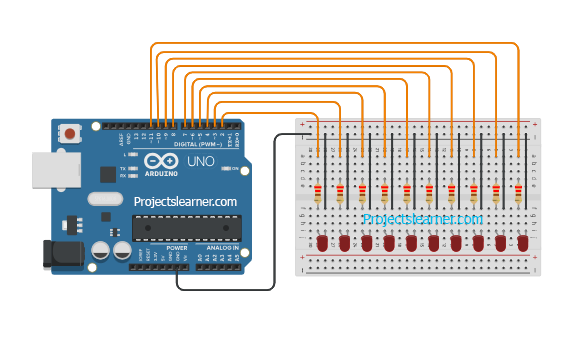
Circuit Diagram
Hardware Wiring Explanation:
Connect each LED’s anode (long leg) to a digital pin on the Arduino.
Connect each LED’s cathode (short leg) through a resistor to GND.
- LED 1: Anode to pin 0, Cathode through a resistor to GND
- LED 2: Anode to pin 1, Cathode through a resistor to GND
- LED 3: Anode to pin 2, Cathode through a resistor to GND
- LED 4: Anode to pin 3, Cathode through a resistor to GND
- LED 5: Anode to pin 4, Cathode through a resistor to GND
- LED 6: Anode to pin 5, Cathode through a resistor to GND
- LED 7: Anode to pin 6, Cathode through a resistor to GND
- LED 8: Anode to pin 7, Cathode through a resistor to GND
- LED 9: Anode to pin 8, Cathode through a resistor to GND
- LED 10: Anode to pin 9, Cathode through a resistor to GND
- LED 11: Anode to pin 10, Cathode through a resistor to GND
- LED 12: Anode to pin 11, Cathode through a resistor to GND
- LED 13: Anode to pin 12, Cathode through a resistor to GND
- LED 14: Anode to pin 13, Cathode through a resistor to GND
Software (Arduino IDE):
Power the Arduino Uno via USB from your computer or using an external power supply (recommended 7-12V DC).
Connect the Arduino to your computer via USB. Upload the above Arduino sketch to the Arduino Uno using the Arduino IDE.
operation:
Learning Points:
Learn how LEDs work, including the importance of current-limiting resistors to prevent damage.
Practice building simple circuits on a breadboard and understand the concept of connections and polarity (anode and cathode).
Understand how similar principles can be used to create various LED effects for visual feedback in projects.