Arduino Uno To Control External LED
It’s a simple and fundamental project that introduces the basics of digital output.
An external LED is connected to the Arduino Uno, and the LED's state (on/off) is controlled via digital pin 13. The Arduino uno is programmed to blink the LED at regular intervals.
Components Needed:
- Arduino UNO Board
- LED
- Resistor (220 ohm)
- Breadboard
- Jumper Wires
- 12v power supply adapter
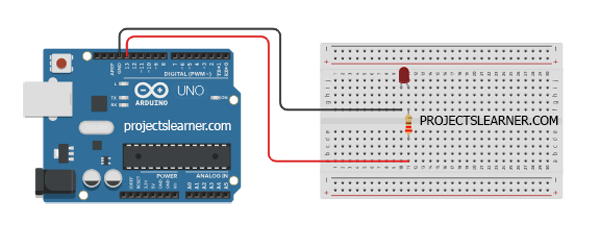
Circuit Diagram
Hardware Wiring Explanation:
Place the LED on the breadboard.
Connect the longer leg (anode) of the LED to pin 13 on the Arduino.
Connect the shorter leg (cathode) of the LED to one end of the 220-ohm resistor.
Connect the other end of the resistor to the GND (ground) pin on the Arduino.
Software (Arduino IDE):
setup:
If you haven’t already, download and install the Arduino IDE on your computer.
Connect your Arduino Uno to your computer using a USB cable.
Verify your code by clicking the checkmark icon (Verify) in the Arduino IDE.
Once verified successfully, upload the code to your
Arduino by clicking the right arrow icon (Upload).
Power the Arduino:
Plug the Arduino into a USB port or power it with an external adapter.
operation:
The LED should light up once the Arduino is powered.
Learning Points:
Programming Logic: Gain experience in writing Arduino code to implement sequential color changes and manage timing for transitions.
Basic Electronics: Develop foundational knowledge of circuitry and components used in simple LED projects, fostering hands-on learning.